Wednesday, May 6, 2020

Cisco SD-WAN with GNS3

To avoid turning this blog into a book, I assume the following:
  • You are already using GNS3 and know how to build basic routing/switching lab.
  • You understand the concept of GNS3 appliance.
  • You know how to download software from Cisco (sorry I cannot provide any Cisco software images or licenses)

This blog is based on the following software:
  • Windows 10
  • VMware Workstation Pro for Windows
  • GNS3 2.2.7 for Windows (with GNS3 VM)

Cisco software images (download from cisco.com):
  • vManage: viptela-vmanage-19.2.2-genericx86-64.qcow2
  • vSmart: viptela-smart-19.2.2-genericx86-64.qcow2
  • vEdge: viptela-edge-19.2.2-genericx86-64.qcow2
  • vBond (same image as vEdge)
  • CSRv with SD-WAN: csr1000v-universalk9.17.02.01r-serial.qcow2.  This file is optional.  It is a Cisco version of vEdge (a.k.a. cEdge).  Some customers prefer using Cisco routers as SD-WAN edge because they already have them purchased.  In your lab, you may use vEdge, cEdge or both.

GNS3 Appliance Templates (download from gns3.com):
  • vManage: viptela-vmanage-genericx86-64.gns3a
  • vSmart: viptela-smart-genericx86-64.gns3a
  • vEdge: viptela-edge-genericx86-64.gns3a
  • vBond: Make a copy of the vEdge file above, name it viptela-bond-genericx86-64.gns3a, change line 2, 4 and 8 to indicate a vBond template.  It's just cosmetic.  Example as below:
{
    "name": "vBond",
    "category": "router",
    "description": "vBond",
    "vendor_name": "Cisco",
    "vendor_url": "https://www.cisco.com",
    "documentation_url": "http://www.cisco.com/",
    "product_name": "VIPtela Bond",
  • empty30G.qcow2

License file (generate from cisco.com.  See https://codingpackets.com/blog/cisco-sdwan-self-hosted-lab-part-1/ for details):
  • serialFile.viptela

SD-WAN icons (png format, download from below):
  • vManage 
  • vSmart
  • vBond
  • vEdge

Steps to import SD-WAN appliances into GNS3

1. From GNS3 > File > Import Appliance.

2. Choose the GNS3 Appliance file (.gns3a) from your hard drive.  e.g viptela-smart-genericx86-64.gns3a

3. Install the appliance on GNS3 VM
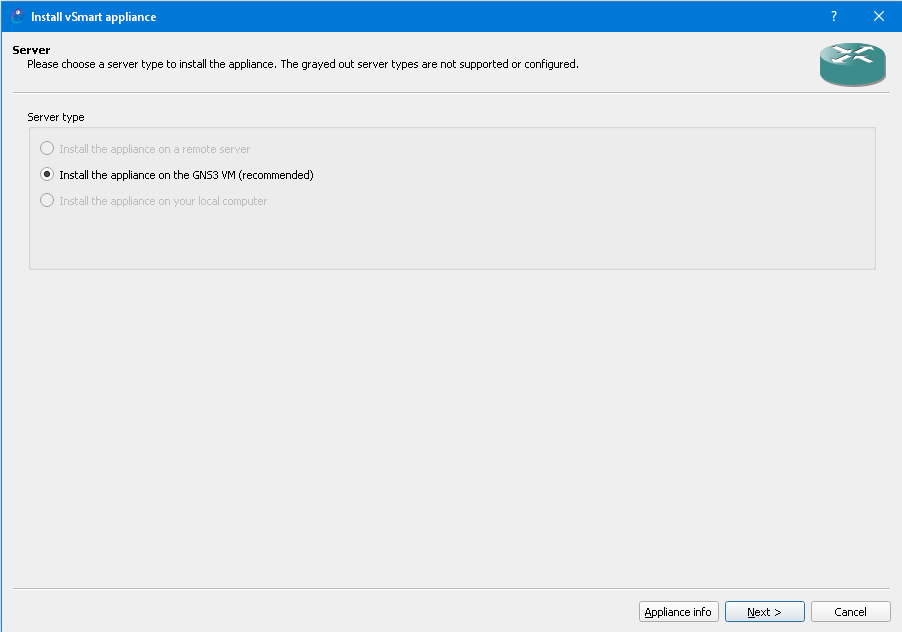


4. QENU V3.1.0 is chosen by default


5. Cisco software image we use here is version 19.2.2, which is not on the list.  We may choose "Create a new version".


6. Type in 19.2.2.  Again, this is cosmetic only.  You may upload 19.2.2 image under the label 19.2.0 and it still works.  But it is a good idea always be accurate.

7. Highlight the missing file under the newly created 19.2.2 version, and click "import"

8. Locate the Cisco SD-WAN image file (.qcow2 file) on your hard drive.  It will start uploading to GNS3 VM once you choose the file.  For some appliances (such as vManage), you will need a secondary qcow2 file (empty30G.qcow2).  Repeat the same steps to import the second file.


9.  Once it finish uploading, you will see "ready to install" message.


10.  Click "Next" to continue install.  Click "Yes" to confirm.

11. Here is the completion screen.

12.  SD-WAN appliances are put into "Router" category in GNS3.  By default, router appliances are given the dark green hockey puck icon.  Optionally, you may change that to more distinguishable SD-WAN icons.  Right-click on the newly added template, then choose "Configure Template".


13. In "General Settings" tab, click "Browse" button on the "Symbol" line.


14. You may either choose from a set of pre-installed symbols(icons), or choose to upload a custom one.  Here we choose to upload a PNG file.  You should already downloaded the SD-WAN icons in previous steps.  Use "Browse" button to locate the PNG file on your hard drive.

15. Now you have the beautiful light blue SD-WAN icons for each appliance templates.


Network Virtualization - OVA or QCOW2?

20 years ago, when I was working on my CCIE R/S, I had to borrow a Cisco 2501 router from a friend's company during the weekend and return it before Monday.  Routers were too expensive for me (and they still are) to build a lab.

Virtualization changes everything.  IOU(IOS on Unix) was a well-known secret on Sun Sparc platform.  And then Cisco 7200/3600 on dynamics.  Then IOL(IOS on Linux) with various front ends including famous GNS3 and EVE-NG.  Then Cisco's official network simulator VIRL.

More and more manufacturers offer virtual appliances of their network products.  Virtual appliances are offered in various formats to support VMware, KVM, MS Hypervisor, etc.  Two of the popular formats are ova (for VMware) and qcow2 (for KVM).

It's pretty straight forward if you plan to run the virtual appliance on physical host.  For example, if you have VMware Workstation/ESXi you'll choose ova.  If you have KVM, you'll choose qcow2.  However, it's not so straight forward if you plan to use them with GNS3.

GNS3, along the time has evolved a lot.  GNS3 is a client/server application suite.  The best practice is to use GNS3 VM, which is a Linux virtual machine with GNS3 server preinstalled.  With GNS3 VM, you may have all kinds of software images (IOS, IOS-XR, NX-OS, Viptela, etc.) contained in a VM.  Makes it easier to package, distribute and share your labs.

If you already have VMware (either Workstation or ESXi), you probably want the GSN3 VM run on VMware.  How about those Cisco appliances?  Shall you download the OVA file so that you may run them on VMware as well?  Not exactly.  In order to take advantage of GNS3's user friendly GUI front end, You'll have to run Cisco appliances inside GNS3 VM.  You'll have to use qcow2 (KVM format).

In theory, you COULD use OVA format.  If you do so, you'll run Cisco appliances outside of the GNS3 VM.  You could still connect those appliances to your GNS3 virtual routers.  But it would be very cumbersome.

In short, if you plan to use GNS3, always download the qcow2 format.


Wednesday, August 22, 2018

Excel, AXL, and Cisco CUCM

Introduction

 Cisco CUCM (CallManager)'s clumsy web GUI has earned its reputation.  :)  It might be OK for a small-to-medium business to perform daily operation on the infamous CCMAdmin GUI.  But it's a nightmare for large organization, especially service providers that need to perform MACD(Move, Add, Change, Delete) on hundreds or thousands of entries.

DevOps is the trend.  No exception on CUCM.  All CUCM configuration is stored in database.  You could view or change the database if you know a little bit about SQL query language.  You either do it from CUCM CLI (command line), or via web calls (SOAP/AXL).

Though database is the most powerful and flexible way to view and change CUCM configuration, it requires you understand the database structure.  You'll have to read the "Database Dictionary" on cisco.com to figure out which table is for what function.  Some of the functions require more than one table, which makes things more complicated.

AXL (Administrative XML Web Service) is another option to manipulate CUCM configuration in a relatively easy way.  Instead of having to know database tables, fields, keys, etc., you may just tell AXL that "I want to list all users with first name Michael".  Then AXL will do the leg work to query database and return desired results.

Obviously, we need to have AXL service running on CUCM.  We also need a user account that has AXL privilege.  Using admin account is the lazy way, but you should create a dedicate AXL account.  To verify AXL service is running and the account has proper privilege, you may put the following URL into a web browser, where "cucm.domain-name.com" is the FQDN of your CallManager server.

https://cucm.domain-name.com:8443/axl/

You should see the following displayed on the web page:

I'm not going to turn this article into an AXL tutorial.  For details, please refer to https://developer.cisco.com/docs/axl/

Excel and VBA

"Why VBA?  It's so old-school!  You should be using Python!"

I'm not a big fan of VBA.  However, Excel's dominance makes it the most common tool across industries.  Office clerks, field engineers, end users, almost everyone has Excel installed on their computers.  Almost everyone knows how to use Excel with no (or very little) training.  In network integration or migration projects, we're still seeing a lot of data being stored in Excel (or CSV) format.

Thus we need to use the data already there to program network gears including CUCM.  VBA is the only built-in script language for MS office suite.  Which means, end users don't have to install any additional software to run the script.

Unfortunately, VBA is not as popular as Python or PHP from developer perspective, especially when it comes to network programming.  There is very little information online to show you how to get things done (concerning network programming).  That doesn't mean it can't be done.  You'll just have to spend more time on research and test.

I did quite a lot of research online.  Couldn't find a complete example of how to make AXL calls to Cisco CUCM from Excel spreadsheet.  I'm sharing my script here so you don't have to reinvent the wheel.

AXL, SOAP, and SoapUI

I assume you know how to code with VBA scripting.  I assume you spent your time reading AXL, SOAP (basically XML).  And of course, I assume you know how to do administrative work on CUCM Admin GUI.  We're not going to cover those topics here.

You may think AXL as programming API.  Before using the API, you need to know what functions are available in the API.  And you also want an easy way to test the API (without involving language-specific coding).  I recommend you download a free version of SoapUI (https://www.soapui.org/downloads/latest-release.html).  Use SoapUI to open the AXLAPI.wsdl downloaded from Cisco (https://developer.cisco.com/docs/axl/#!download-the-axl-wsdl/download-the-axl-wsdl).  Then you may test the AXL calls and examine the SOAP/XML being sent and received.


In the screen above, the XML code on left hand side is the request, the XML code on right is the response from CUCM.  It is a example of querying a Calling Search Space (CSS) and get all partitions in that CSS.

Excel and VBA Script

Now we build an Excel spreadsheet like below:


There are a few cells in the spreadsheet need to be filled out:
1) The FQDN of CUCM publisher (AXL server)
2) Username
3) Password
4) Calling Search Space (CSS) name

When click on the 'Execute' button, the script will reach out to CUCM and retrieve all partitions in that CSS.  Then it'll fill the partition names in cell B8, B9, B10, ... so on so forth.

You see another benefit of using Excel is that:
1) You have a place to store the data input
2) You have a place to store the data output

This is what it looks like on CCMAdmin:


This is what it looks like after clicking the 'Execute' button in spreadsheet:


This is the script:


By the way, in order to use the XML objects, you need to enable the reference to "Microsoft XML v6.0".


Friday, April 6, 2018

Network Automation with TCL

My company has a large (and not very well managed) network.  Different VLANs have different "ip helper-address" (DHCP) settings.  Some of them are pointing to development DHCP, some of them pointing to production DHCP, some of them are pointing to VDI environment.

For the production environment, there are two DHCP servers (A and B).  They are supposed to back up each other.  However some of the VLANs might be configured to use one of them but not both.

The DHCP administrator wanted to perform a DR test, which he would shut down one of the DHCP servers and see if the clients still be able to get IP address from the other server.

Before he can perform the DR test, he needs to make sure that DHCP server A and B are referenced in pairs, which means a interface either references both servers, or reference neither server.  If the interface references only one of the two, it'd be a problem.  We need to fix this problem before the DR test.

So the workflow is pretty straight forward:
1) SSH into a switch (where the  IP interfaces are configured).
2) Use "show ip interface brief | exclude unassigned" to display the interfaces with IP configured.
3) Use "show run interface xxx" command to review the configuration.  If one of the DHCP servers (A or B) was referenced but the other one of missing, we need to add the other one to the configuration.

* If both are present, it's fine.  If none of them present, that's fine.

This is a simple but tedious work.  Because we have a bunch of switches.  Some of the switches have more than 50 SVIs.  Visual inspection would be  time consuming and prone to human errors.

This is where automation should kick in.  You may use other program languages.  I chose TCL because it was built in on IOS.

In privilege (enable) mode, type "tclsh" to get into TCL shell.  Copy and paste the script into the command line.  It will create a procedure called "check".  Then type "check" (without quotation marks).  Below are some sample outputs:

Example 1: No problem found.

Example 2: Found some interfaces missing one of the helpers.


Script is as below.
proc check {} {

# Define the two commands we want to check
set str_helper1 "ip helper-address 10.50.23.27"
set str_helper2 "ip helper-address 10.202.32.30"

# Define missing_commands string
set str_missing_cmds ""

# List all the interfaces with IP address.
set str_sh_ip_int [exec sh ip int br | ex una]

# Break the output into individual lines and put them in a list.  First two lines are headers.
set list_int [split $str_sh_ip_int \n]

# Get the number of lines
set num_num_of_lines [llength $list_int]

# Skip headers, start from 1st interface
set num_current_line 2

# Process each each line (each IP interface).
while { $num_current_line < $num_num_of_lines } {

    # Get the interface name from each line.
    set str_int_name [lindex [split [lindex $list_int $num_current_line]] 0]

    # Do a "show run interface" againt the interface name.
    set str_sh_run_int [exec sh run int $str_int_name]

    # See if helper1 exists but not helper2
    if { [string match "*$str_helper1*" $str_sh_run_int] && ![string match "*$str_helper2*" $str_sh_run_int] } {
        append str_missing_cmds "interface $str_int_name\n $str_helper2\n"

    # See if helper2 exists but not helper1
    } elseif { [string match "*$str_helper2*" $str_sh_run_int] && ![string match "*$str_helper1*" $str_sh_run_int] } {
        append str_missing_cmds "interface $str_int_name\n $str_helper1\n"
    }

    # Move to next line (next IP interface)
    incr num_current_line
}

# Missing helper on some of the interfaces
if {[string length $str_missing_cmds]} {
    puts "\n\nIP Interface(s):"
    puts "----------------"
    puts $str_sh_ip_int
    puts "\n[expr $num_num_of_lines-2] interface(s) checked.  The following commands are missing:\n"
    puts $str_missing_cmds

# All interfaces are good
} else {
    puts "\n\nIP Interface(s):"
    puts "----------------"
    puts $str_sh_ip_int
    puts "\n[expr $num_num_of_lines-2] interface(s) checked.  No Problem Found."
}

}


Monday, February 20, 2017

IP Calculator Functions for Spreadsheet

Spreadsheet (e.g. Microsoft Excel) is a very powerful tool for network engineers.  I use spreadsheet to build network configuration scripts, especially for large scale deployment/migration.  For example, how about crating 100 VLANs and their corresponding SVIs with HSRP?

Due to the format of IP address we're accustomed to, it's not very easy to build configuration scripts with native spreadsheet functions.  For example:

Given a IP subnet "10.2.0.0/22", what is the last host IP in the subnet?  Or what is the wildcard of the subnet?

I've tried different tools and add-ons and settled for "IP Calculator for Excel" (http://trk.free.fr/ipcalc/) due to the following reasons:

1) Integrated and Unified - it was built with VBA macros.  You may use the functions just the same way as the native Excel functions.  e.g. "=ipAdd(A1,2)" takes the IP address from cell A1 and returns an IP address with addition 2.  Thus you may build formulas the same way you do in any regular Excel spreadsheet.

2) Light weighted - the macro is less than 40k.  Thus it won't add too much weigh on your spreadsheet.

3) No EXE.  It is embedded into spreadsheet as macro.  Thus it doesn't trigger any security or policy alerts.  Of course, you still have to enable macros from Excel though.

4) IPv4 and IPv6 support.

If you're a network engineer who works on large scale network, take a look at this tool.  It'll save you tons of time and human errors.

Friday, May 13, 2016

QoS Test Tool on Windows 7 (or above)

The Hunt


I was trying to find a packet generator for my customer.  Customer wants to run the packet generator on Windows 7 (or Windows 10) to mark DSCP on outgoing packets.  So he can test QoS policies on Cisco routers.

This would be an easy task if we were to generate packets from a Cisco router.  We just use extended ping and specify TOS values.  See http://routerric.blogspot.com/2010/05/dscp-to-tos-conversion.html

This is also an easy task on Windows XP with the "ping -v" option or Linux with the "ping -Q" option.  See http://robert.penz.name/654/howto-to-quick-test-a-dscp-based-qos-system/

However, this is a not so easy task on Windows 7 (or newer version of Windows) for two reasons:

1) The "-v"  option has been deprecated since Windows 7.  It has no effect on the type of service field in the IP header.

2) Microsoft changed the IP stack in Windows.  Packet generators used to work on Windows XP no longer work on Windows 7.  ("No longer work" meaning lose some functionality, such as DSCP marking).

Due to historical reasons, most of the packet generator apps were originally built on Linux and "ported" to Windows later (e.g. iPerf).  The developers didn't build the Windows variant from scratch and didn't follow Microsoft's recommendation (i.e. use Microsoft APIs).  Thus when MS changed the IP stack, it broke quite many apps.

Microsoft's "Policy Based QoS" makes things more confusing.  There are many misleading and incorrect articles on Internet.

I spent the last couple days researching this and tested many different software.  I'd like to share my experience so you know where to look at.

If you could generate the packets from Cisco router or Linux, it'll be the best choice.  If Windows is your only option, read on.

If you're still running Windows XP, there are quite many software out there that can mark DSCP in IP headers.  Just Google it and you'll find a bunch.  No tricks here.

If you're running Windows 7 or later version, things get complicated.

Software that works and doesn't work


First of all, not all packet generators can mark DSCP on Windows 7, even if they claimed so.  For example: iPerf, "iPerf For Windows" (commercial ware), D-ITG, TamoSoft all claimed to be able to mark DSCP on Windows 7 but they are not.

I haven't tested every software out there.  But here are the two tested to work: PingPlotter and Ostinato.

Policy Based QoS and Application QoS

What's interesting is - regardless working or not, many of them have wrong information regarding Microsoft registry keys and Policy Based QoS.  For example the following URLs have wrong info and has no effect on their applications:

http://www.iperfwindows.com/IPERF-QoS-tests2.html
https://www.pingman.com/kb/article/setting-dscp-qos-byte-on-packets-with-windows-7-8-95.html

On Windows, there are two places DSCP can be marked:
1) By applictions
2) By Windows

Policy Based QoS

If application doesn't have the function to mark DSCP, we may have Windows to mark it.  Even if application is capable of marking DSCP, we may have Windows to override it.  If Windows marking was involved, it is called "Policy Based QoS".

Application QoS

Some applications are capable to mark DSCP.  We call this "Application QoS" (or "QoS aware applications").  From packet generator perspective, we'd prefer Application QoS.  It's easier to set different DSCP values from application than configuring policies in Windows.

There are many untrue myths regarding Windows registry keys and group policies.

1. "DisableUserTOSSetting"

HKEY_LOCAL_MACHINE\SYSTEM\CurrentControlSet\Services\TcpIp\Parameters

Here is the official document regarding this key: https://support.microsoft.com/en-us/kb/248611

This key applies to Windows 2000, Windows XP, or Windows Server 2003.  It enables the Winsock setsockopt function (which is disabled by default).

This registry is to provide backward compatibility with Windows NT 4.0 and Windows 9x.  This registry is disabled by default because it bypasses GQOS (Generic QoS Implementation).  GQOS is recommended by Microsoft on Windows 2000, Windows XP, or Windows Server 2003.

Unless your packet generator is calling the setsockopt function, you don't need to set this registry key.  For example, PingPlotter and Ostinato work without this key.

Here's the history of QoS on Windows: https://msdn.microsoft.com/en-us/library/windows/desktop/ff459285%28v=vs.85%29.aspx

2. "Do not use NLA"

HKLM\SYSTEM\CURRENTCONTROLSET\SERVICES\TCPIP\QoS

This key is relevant to Policy Based QoS only.  If you use application QoS(which happens to be my goal) instead of Policy Based QoS, you don't need this key.

Policy Based QoS is a set of rules that instruct Windows set specific DSCP markings or shape traffic based on IP address, protocol or application.  If Policy Based QoS was configured, Windows overrides DSCP set by the application (you may changed this behavior by changing the "Advanced QoS Settings" under "Policy Based Qos").

Here's the official explanation of this key: https://support.microsoft.com/en-us/kb/2733528
Here's the document about Policy Based QoS: https://technet.microsoft.com/en-us/library/dd759093%28v=ws.11%29.aspx


Conclusion


If your goal was to get packet generator on Windows 7 (or later) to set DSCP value on outgoing packets,

1) Don't create any Policy Based QoS rules on Windows.  Doing so will make Windows override the DSCP markings.  Any DSCP set by application is in vain.

2) Don't mess with the "Do not use NLA" key.  That key is to enable not domain-joined PC to use Policy Based QoS.

3) You may or may not need to set the "DisableUserTOSSetting" key, depending on the packet generator you use.  However, I haven't found any packet generator relying on this key.  They either not work regardless (such as iPerf) or work regardless (such as PingPlotter or Ostinato).

Sunday, November 8, 2015

Finally TACACS on ISE


Cisco has been persuading people migrate ACS to ISE.  However one of the hold-backs is ISE's lack of TACACS support.  ISE 2.0 finally supports TACACS.  This article is to demonstrate a "barebone" configuration of TACACS with ISE 2.0.

One of the important features of TACACS is "per command authorization", which means you can customize which commands users are allowed to execute.  For example, you'd like to allow HelpDesk users use most of the "show" commands.  So they can show interface status, show routing table, etc.  However, you don't want them be able to "show running-config" as the configuration file contains sensitive information (such as SNMP RW community string).  This is the most popular use case of TACACS.  This article will show you how to do it with ISE 2.0.

Before diving into configuration, let's review the AAA authorization flow chart.

As seen from the flow chart above, "priv_level" takes precedence over "User Profile"(in ISE it is called "Command Set").  Let say, if the logged in user was put into priv_level 1, it doesn't matter if the "Command Set" allows "show run" or not.  Because "show run" is not available in priv_level 1.

In our example, we'll put the user in priv_level 15.  Then we'll restrict the commands with "Command Set".

ISE Configuration

 ISE configuration is as simple as 1, 2, 3 as shown below:


1. Enable Device Admin Service

Go to "Administration > System > Deployment > Your ISE node (server)".  Check the "Enable Device Admin Service" check box and Save.

2. Enable TACACS for Network Devices

Go to "Administration > Network Resource > Network Devices".  Please note that you may create specific network devices here so they can have different settings.  For simplicity, I choose "Default Device".  Check the "TACACS+ Authentication Settings" checkbox and enter a "Shared Secret".  You will configure the same "shared secret" phrase in router config later on.  (a.k.a. TACACS key)

3. Configure "Device Admin Policy Set"

"Device Admin Policy Set" is a set of rules to customize the user access.  Before you can configure "Device Admin Policy Set", you'll have to configure the following first:
  • Identity/Identity Group (user/user group)
  • TACACS Command Set
  • TACACS Profile

3.1 Configure Identity/Identity Group

It is the best practice to put users into groups.  Then assign permissions to groups.

To create an identity group (user group), go to "Administration > Identity Management > Groups > User Identity Groups".  Click the "Add" button to add a group called "HelpDesk_Group".
To create an identity (user), go to "Administration > Identity Management > Identities > Users".  Click the "Add" button to add an identity (user) called "jdoe".  Put the user into "HelpDesk_Group".

3.2 Configure "Command Set"

"Command Set" define which command the user can or cannot execute.
Go to "Work Centers > Policy Results > TACACS Command Sets".  Add a new command set called "HelpDesk_CommandSet".  As show in the picture above, we'll add three command rules:
1) PERMIT, show, .*
This rule allow all the commands begin with "show", such as "show interface", "show ip route", etc.
However, we don't want the HelpDesk users to be able to see the full configuration (either running-config or startup-config").  Thus we'll have to exclude the "show running-config" and "show startup-config" commands.
2) DENY_ALWAYS, show, running-config
3) DENY_ALWAYS, show, startup-config
Rule #2 and #3 above exclude the corresponding commands.
You might wonder what's the difference between "DENY" and "DENY_ALWAYS".  ISE examines the rules from top to bottom.  Once it found a matching rule, it'll stop examining the remaining rules.  Thus the order of the rules is very important.  "DENY_ALWAYS" rules are always examined first regardless of their position on the list.  This is to make sure the ones you want to deny will definitely be denied.  Of course, you may use "DENY" instead.  Just to make sure the DENY rules are on top of the PERMIT rules.

3.3 Configure TACACS Profile

Go to "Work Centers > Policy Results > TACACS Profiles".  Add a new profile called "HelpDesk_Profile".  Set the default priviledge and maximum privilege to 15.
Depending on the use case, you may set different privilege levels.  But in our example, we want to control the access with Command Set instead of Privilege Level.  That's why we set the privilege level to 15 (highest).

3.4 Configure Device Admin Policy Set

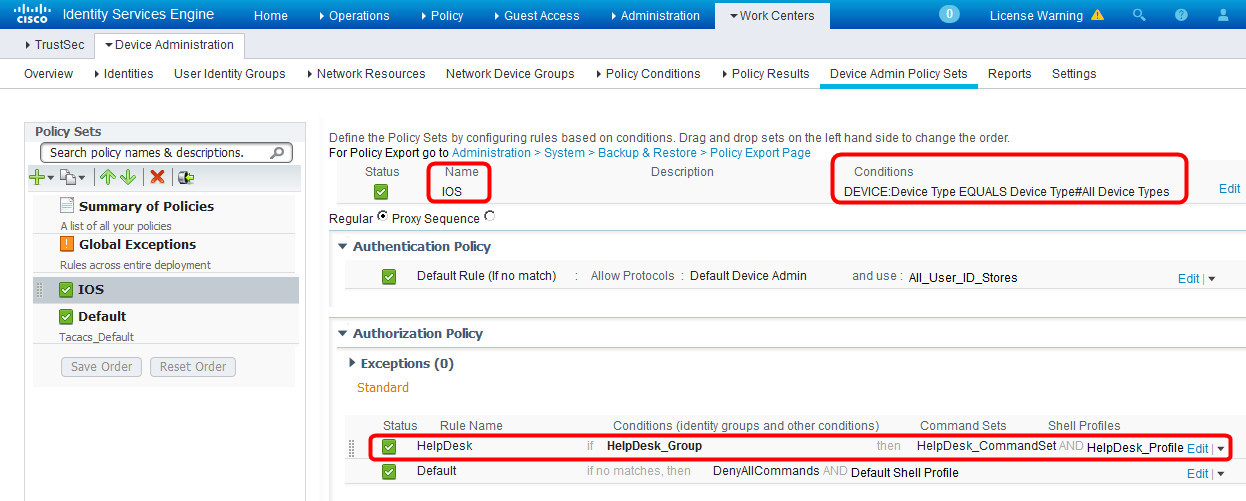
Now with all prerequisite ready, go to "Work Centers > Device Administration > Device Admin Policy Sets".  Click "Add" button to add a policy set called "IOS" above the "Default" policy set.

Three attributes need to be configured:
1) Name
2) Condition - in our example, condition doesn't matter but it cannot be blank.  Thus we add a condition "Device Type=All", which is a "always true" condition.
3) Authorization Rule - in our example, we want to control what the user can do.  This is called "per command authorization".  The rule says:
IF the logged in user is within "HelpDesk_Group" do the following:
A) Apply shell profile "HelpDesk_Profile" (in our example, the whole purpose of the profile is to set priv_level to 15).
B) For each command user entered, check against "HelpDesk_CommandSet" to permit or deny.


 IOS Configuration

! -- Have to enter this first, otherwise some commands are not available
aaa new-model
! -- Define TACACS server
tacacs server ISE
 address ipv4 192.168.21.10
 key Cisco123
!
! -- Define TACACS server group 'ISE_GROUP'
aaa group server tacacs+ ISE_GROUP
 server name ISE
!
! -- Define a local user in case TACACS is not available
username cisco privilege 15 password 0 cisco
! -- Default method is no authentication or authorization
aaa authentication login default none
aaa authorization exec default none
!
! -- Define method 'ABC' for authentication and authorization
aaa authentication login ABC group ISE_GROUP local
aaa authorization exec ABC group ISE_GROUP local
aaa authorization commands 15 ABC group ISE_GROUP local
aaa authorization config-commands
!
! -- Use method ABC on VTY authentication and authorization
line vty 0 4
 login authentication ABC
 authorization exec ABC
 authorization commands 15 ABC
 transport input all

Test

Telnet to the router.  Log in with user 'jdoe'.  Try some commands.  We see that the user can run all the show commands except for "show run" and "show start".  The user cannot run any other commands (such as "conf t").

Troubleshooting

On ISE there is a "Operation > TACACS Livelog" screen.  We may see realtime authentication and authorization events.
Click on the "Details" icon to view detailed TACACS authorization report.


Another Example of Command Set


The above command set will do the following:
1) Allow all "show" commands except for "show running-config" and "show startup-config" (to view the full configuration file)
2) However, it allows "show running-config interface" to view the configuration of a specific interface.
3) Allow "clear counters" command.

Please note the order of the rules.  With the same command, more specific arguments should be on the top.  Less specific arguments should be at the bottom.