Sunday, May 24, 2020

cEdge - Single Image Switch to Controller Mode

cEdge is a Cisco router acting as SD WAN Edge.  Cisco's road map is to replace vEdge products with cEdge.  cEdge can be on ISR, ASR and CSR, as well as their corresponding virtual variants (such as ISR 1000v, CSR 1000v, etc.)

When the above devices operating in "regular mode", it's called "Autonomous Mode", which is your good old IOS XE command system.  When they operate in "SD WAN mode", it's called "Controller Mode", which is Viptela-like command system.

In pre-17.2 versions, you'll have to load different software on the router to support different modes.  Since version 17.2.1r, one single image can support two different modes.  Please see https://community.cisco.com/t5/networking-blogs/ios-xe-17-2-1r-single-again-and-ready-to-mingle/bc-p/4091398

I put CSR 1000v 17.2.1r in my GNS3 lab.  It boots into autonomous mode by default.  I tried to switch it to controller mode with no luck.  I was referring to https://www.cisco.com/c/en/us/td/docs/routers/sdwan/configuration/sdwan-xe-gs-book/install-upgrade-17-2-later.html#d17982e2074a1635.  Also https://codingpackets.com/blog/cisco-sdwan-self-hosted-lab-part-2/

I did quite a lot research.  However, this version is too new to yield any helpful resource online.  I finally figured it out.  It's a documentation issue.

First, let's take a look at Cisco documentation below:


Per above documentation, the cfg file (in router bootflash:) will trigger the mode change.  That is NOT TRUE!  At least not in CRS 1000v 17.2.1r.  The cfg file won't be used UNTIL the router is switched to controller mode.

To switch from autonomous mode to controller mode, you use CLI command "controller-mode enable".  Router will warn you that all configuration will be lost.  After conformation, router will reboot into controller mode.

The first sign of controller mode is - you'll be prompted to enter username/password, even if you don't have it set up previously.  Default username/password is admin/admin, which aligns with Viptela defaults.


After login, you may use the following commands to double confirm it's in controller mode:


Wednesday, May 6, 2020

Cisco SD-WAN with GNS3

To avoid turning this blog into a book, I assume the following:
  • You are already using GNS3 and know how to build basic routing/switching lab.
  • You understand the concept of GNS3 appliance.
  • You know how to download software from Cisco (sorry I cannot provide any Cisco software images or licenses)

This blog is based on the following software:
  • Windows 10
  • VMware Workstation Pro for Windows
  • GNS3 2.2.7 for Windows (with GNS3 VM)

Cisco software images (download from cisco.com):
  • vManage: viptela-vmanage-19.2.2-genericx86-64.qcow2
  • vSmart: viptela-smart-19.2.2-genericx86-64.qcow2
  • vEdge: viptela-edge-19.2.2-genericx86-64.qcow2
  • vBond (same image as vEdge)
  • CSRv with SD-WAN: csr1000v-universalk9.17.02.01r-serial.qcow2.  This file is optional.  It is a Cisco version of vEdge (a.k.a. cEdge).  Some customers prefer using Cisco routers as SD-WAN edge because they already have them purchased.  In your lab, you may use vEdge, cEdge or both.

GNS3 Appliance Templates (download from gns3.com):
  • vManage: viptela-vmanage-genericx86-64.gns3a
  • vSmart: viptela-smart-genericx86-64.gns3a
  • vEdge: viptela-edge-genericx86-64.gns3a
  • vBond: Make a copy of the vEdge file above, name it viptela-bond-genericx86-64.gns3a, change line 2, 4 and 8 to indicate a vBond template.  It's just cosmetic.  Example as below:
{
    "name": "vBond",
    "category": "router",
    "description": "vBond",
    "vendor_name": "Cisco",
    "vendor_url": "https://www.cisco.com",
    "documentation_url": "http://www.cisco.com/",
    "product_name": "VIPtela Bond",
  • empty30G.qcow2

License file (generate from cisco.com.  See https://codingpackets.com/blog/cisco-sdwan-self-hosted-lab-part-1/ for details):
  • serialFile.viptela

SD-WAN icons (png format, download from below):
  • vManage 
  • vSmart
  • vBond
  • vEdge

Steps to import SD-WAN appliances into GNS3

1. From GNS3 > File > Import Appliance.

2. Choose the GNS3 Appliance file (.gns3a) from your hard drive.  e.g viptela-smart-genericx86-64.gns3a

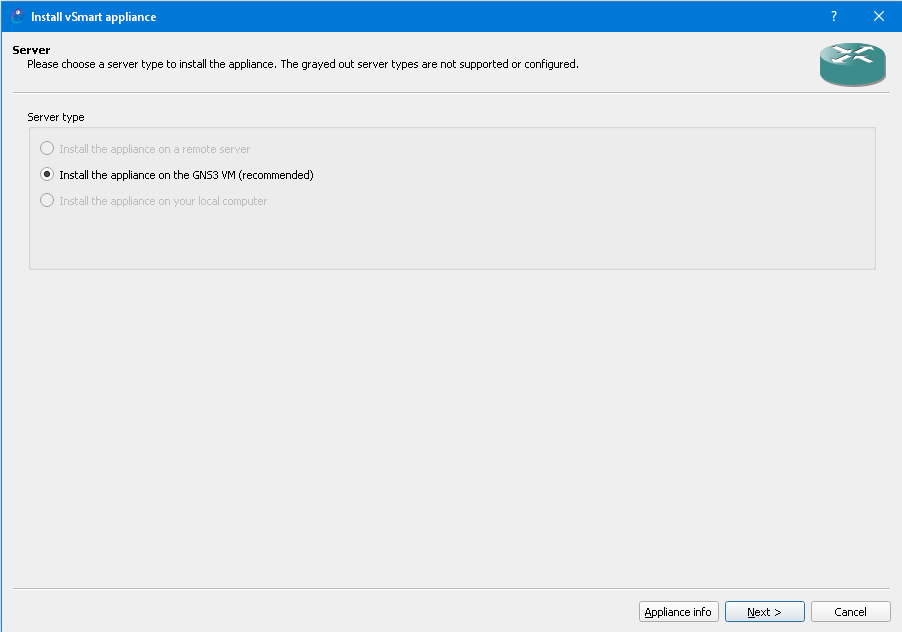
3. Install the appliance on GNS3 VM


4. QENU V3.1.0 is chosen by default


5. Cisco software image we use here is version 19.2.2, which is not on the list.  We may choose "Create a new version".


6. Type in 19.2.2.  Again, this is cosmetic only.  You may upload 19.2.2 image under the label 19.2.0 and it still works.  But it is a good idea always be accurate.

7. Highlight the missing file under the newly created 19.2.2 version, and click "import"

8. Locate the Cisco SD-WAN image file (.qcow2 file) on your hard drive.  It will start uploading to GNS3 VM once you choose the file.  For some appliances (such as vManage), you will need a secondary qcow2 file (empty30G.qcow2).  Repeat the same steps to import the second file.


9.  Once it finish uploading, you will see "ready to install" message.


10.  Click "Next" to continue install.  Click "Yes" to confirm.

11. Here is the completion screen.

12.  SD-WAN appliances are put into "Router" category in GNS3.  By default, router appliances are given the dark green hockey puck icon.  Optionally, you may change that to more distinguishable SD-WAN icons.  Right-click on the newly added template, then choose "Configure Template".


13. In "General Settings" tab, click "Browse" button on the "Symbol" line.


14. You may either choose from a set of pre-installed symbols(icons), or choose to upload a custom one.  Here we choose to upload a PNG file.  You should already downloaded the SD-WAN icons in previous steps.  Use "Browse" button to locate the PNG file on your hard drive.

15. Now you have the beautiful light blue SD-WAN icons for each appliance templates.


Network Virtualization - OVA or QCOW2?

20 years ago, when I was working on my CCIE R/S, I had to borrow a Cisco 2501 router from a friend's company during the weekend and return it before Monday.  Routers were too expensive for me (and they still are) to build a lab.

Virtualization changes everything.  IOU(IOS on Unix) was a well-known secret on Sun Sparc platform.  And then Cisco 7200/3600 on dynamics.  Then IOL(IOS on Linux) with various front ends including famous GNS3 and EVE-NG.  Then Cisco's official network simulator VIRL.

More and more manufacturers offer virtual appliances of their network products.  Virtual appliances are offered in various formats to support VMware, KVM, MS Hypervisor, etc.  Two of the popular formats are ova (for VMware) and qcow2 (for KVM).

It's pretty straight forward if you plan to run the virtual appliance on physical host.  For example, if you have VMware Workstation/ESXi you'll choose ova.  If you have KVM, you'll choose qcow2.  However, it's not so straight forward if you plan to use them with GNS3.

GNS3, along the time has evolved a lot.  GNS3 is a client/server application suite.  The best practice is to use GNS3 VM, which is a Linux virtual machine with GNS3 server preinstalled.  With GNS3 VM, you may have all kinds of software images (IOS, IOS-XR, NX-OS, Viptela, etc.) contained in a VM.  Makes it easier to package, distribute and share your labs.

If you already have VMware (either Workstation or ESXi), you probably want the GSN3 VM run on VMware.  How about those Cisco appliances?  Shall you download the OVA file so that you may run them on VMware as well?  Not exactly.  In order to take advantage of GNS3's user friendly GUI front end, You'll have to run Cisco appliances inside GNS3 VM.  You'll have to use qcow2 (KVM format).

In theory, you COULD use OVA format.  If you do so, you'll run Cisco appliances outside of the GNS3 VM.  You could still connect those appliances to your GNS3 virtual routers.  But it would be very cumbersome.

In short, if you plan to use GNS3, always download the qcow2 format.


Wednesday, August 22, 2018

Excel, AXL, and Cisco CUCM

Introduction

 Cisco CUCM (CallManager)'s clumsy web GUI has earned its reputation.  :)  It might be OK for a small-to-medium business to perform daily operation on the infamous CCMAdmin GUI.  But it's a nightmare for large organization, especially service providers that need to perform MACD(Move, Add, Change, Delete) on hundreds or thousands of entries.

DevOps is the trend.  No exception on CUCM.  All CUCM configuration is stored in database.  You could view or change the database if you know a little bit about SQL query language.  You either do it from CUCM CLI (command line), or via web calls (SOAP/AXL).

Though database is the most powerful and flexible way to view and change CUCM configuration, it requires you understand the database structure.  You'll have to read the "Database Dictionary" on cisco.com to figure out which table is for what function.  Some of the functions require more than one table, which makes things more complicated.

AXL (Administrative XML Web Service) is another option to manipulate CUCM configuration in a relatively easy way.  Instead of having to know database tables, fields, keys, etc., you may just tell AXL that "I want to list all users with first name Michael".  Then AXL will do the leg work to query database and return desired results.

Obviously, we need to have AXL service running on CUCM.  We also need a user account that has AXL privilege.  Using admin account is the lazy way, but you should create a dedicate AXL account.  To verify AXL service is running and the account has proper privilege, you may put the following URL into a web browser, where "cucm.domain-name.com" is the FQDN of your CallManager server.

https://cucm.domain-name.com:8443/axl/

You should see the following displayed on the web page:

I'm not going to turn this article into an AXL tutorial.  For details, please refer to https://developer.cisco.com/docs/axl/

Excel and VBA

"Why VBA?  It's so old-school!  You should be using Python!"

I'm not a big fan of VBA.  However, Excel's dominance makes it the most common tool across industries.  Office clerks, field engineers, end users, almost everyone has Excel installed on their computers.  Almost everyone knows how to use Excel with no (or very little) training.  In network integration or migration projects, we're still seeing a lot of data being stored in Excel (or CSV) format.

Thus we need to use the data already there to program network gears including CUCM.  VBA is the only built-in script language for MS office suite.  Which means, end users don't have to install any additional software to run the script.

Unfortunately, VBA is not as popular as Python or PHP from developer perspective, especially when it comes to network programming.  There is very little information online to show you how to get things done (concerning network programming).  That doesn't mean it can't be done.  You'll just have to spend more time on research and test.

I did quite a lot of research online.  Couldn't find a complete example of how to make AXL calls to Cisco CUCM from Excel spreadsheet.  I'm sharing my script here so you don't have to reinvent the wheel.

AXL, SOAP, and SoapUI

I assume you know how to code with VBA scripting.  I assume you spent your time reading AXL, SOAP (basically XML).  And of course, I assume you know how to do administrative work on CUCM Admin GUI.  We're not going to cover those topics here.

You may think AXL as programming API.  Before using the API, you need to know what functions are available in the API.  And you also want an easy way to test the API (without involving language-specific coding).  I recommend you download a free version of SoapUI (https://www.soapui.org/downloads/latest-release.html).  Use SoapUI to open the AXLAPI.wsdl downloaded from Cisco (https://developer.cisco.com/docs/axl/#!download-the-axl-wsdl/download-the-axl-wsdl).  Then you may test the AXL calls and examine the SOAP/XML being sent and received.


In the screen above, the XML code on left hand side is the request, the XML code on right is the response from CUCM.  It is a example of querying a Calling Search Space (CSS) and get all partitions in that CSS.

Excel and VBA Script

Now we build an Excel spreadsheet like below:


There are a few cells in the spreadsheet need to be filled out:
1) The FQDN of CUCM publisher (AXL server)
2) Username
3) Password
4) Calling Search Space (CSS) name

When click on the 'Execute' button, the script will reach out to CUCM and retrieve all partitions in that CSS.  Then it'll fill the partition names in cell B8, B9, B10, ... so on so forth.

You see another benefit of using Excel is that:
1) You have a place to store the data input
2) You have a place to store the data output

This is what it looks like on CCMAdmin:


This is what it looks like after clicking the 'Execute' button in spreadsheet:


This is the script:


By the way, in order to use the XML objects, you need to enable the reference to "Microsoft XML v6.0".