One of the important features of TACACS is "per command authorization", which means you can customize which commands users are allowed to execute. For example, you'd like to allow HelpDesk users use most of the "show" commands. So they can show interface status, show routing table, etc. However, you don't want them be able to "show running-config" as the configuration file contains sensitive information (such as SNMP RW community string). This is the most popular use case of TACACS. This article will show you how to do it with ISE 2.0.
Before diving into configuration, let's review the AAA authorization flow chart.

In our example, we'll put the user in priv_level 15. Then we'll restrict the commands with "Command Set".
ISE Configuration
ISE configuration is as simple as 1, 2, 3 as shown below:
1. Enable Device Admin Service

2. Enable TACACS for Network Devices

3. Configure "Device Admin Policy Set"
"Device Admin Policy Set" is a set of rules to customize the user access. Before you can configure "Device Admin Policy Set", you'll have to configure the following first:- Identity/Identity Group (user/user group)
- TACACS Command Set
- TACACS Profile
3.1 Configure Identity/Identity Group
It is the best practice to put users into groups. Then assign permissions to groups.To create an identity group (user group), go to "Administration > Identity Management > Groups > User Identity Groups". Click the "Add" button to add a group called "HelpDesk_Group".


3.2 Configure "Command Set"
"Command Set" define which command the user can or cannot execute.
1) PERMIT, show, .*
This rule allow all the commands begin with "show", such as "show interface", "show ip route", etc.
However, we don't want the HelpDesk users to be able to see the full configuration (either running-config or startup-config"). Thus we'll have to exclude the "show running-config" and "show startup-config" commands.
2) DENY_ALWAYS, show, running-config
3) DENY_ALWAYS, show, startup-config
Rule #2 and #3 above exclude the corresponding commands.
You might wonder what's the difference between "DENY" and "DENY_ALWAYS". ISE examines the rules from top to bottom. Once it found a matching rule, it'll stop examining the remaining rules. Thus the order of the rules is very important. "DENY_ALWAYS" rules are always examined first regardless of their position on the list. This is to make sure the ones you want to deny will definitely be denied. Of course, you may use "DENY" instead. Just to make sure the DENY rules are on top of the PERMIT rules.
3.3 Configure TACACS Profile
Go to "Work Centers > Policy Results > TACACS Profiles". Add a new profile called "HelpDesk_Profile". Set the default priviledge and maximum privilege to 15.
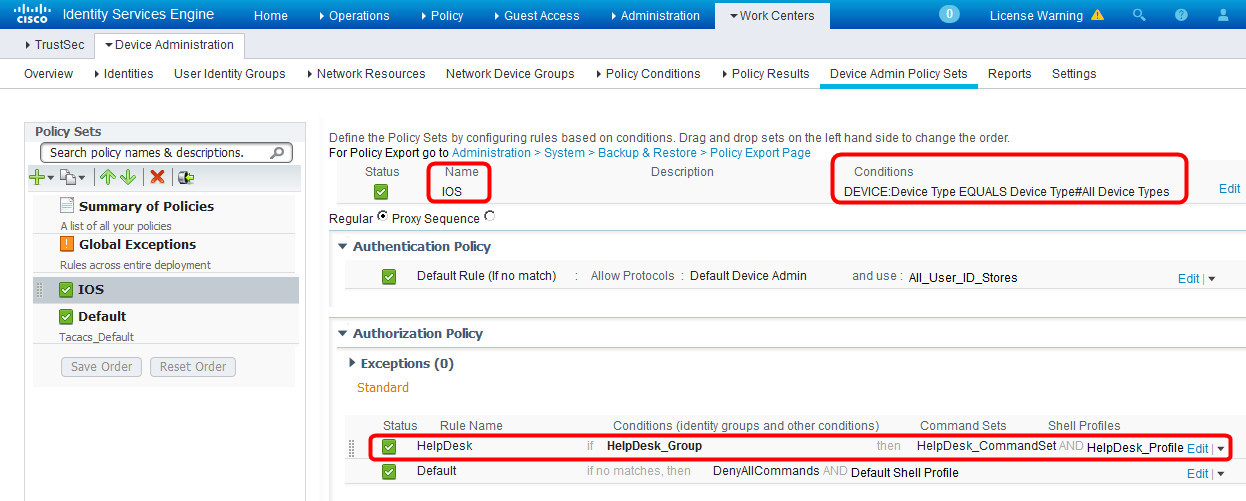
3.4 Configure Device Admin Policy Set
Now with all prerequisite ready, go to "Work Centers > Device Administration > Device Admin Policy Sets". Click "Add" button to add a policy set called "IOS" above the "Default" policy set.
1) Name
2) Condition - in our example, condition doesn't matter but it cannot be blank. Thus we add a condition "Device Type=All", which is a "always true" condition.
3) Authorization Rule - in our example, we want to control what the user can do. This is called "per command authorization". The rule says:
IF the logged in user is within "HelpDesk_Group" do the following:
A) Apply shell profile "HelpDesk_Profile" (in our example, the whole purpose of the profile is to set priv_level to 15).
B) For each command user entered, check against "HelpDesk_CommandSet" to permit or deny.
IOS Configuration
! -- Have to enter this first, otherwise some commands are not available
aaa new-model
! -- Define TACACS server
tacacs server ISE
address ipv4 192.168.21.10
key Cisco123
!
! -- Define TACACS server group 'ISE_GROUP'
aaa group server tacacs+ ISE_GROUP
server name ISE
!
! -- Define a local user in case TACACS is not available
username cisco privilege 15 password 0 cisco
! -- Default method is no authentication or authorization
aaa authentication login default none
aaa authorization exec default none
!
! -- Define method 'ABC' for authentication and authorization
aaa authentication login ABC group ISE_GROUP local
aaa authorization exec ABC group ISE_GROUP local
aaa authorization commands 15 ABC group ISE_GROUP local
aaa authorization config-commands
!
! -- Use method ABC on VTY authentication and authorization
line vty 0 4
login authentication ABC
authorization exec ABC
authorization commands 15 ABC
transport input all
Test
Telnet to the router. Log in with user 'jdoe'. Try some commands. We see that the user can run all the show commands except for "show run" and "show start". The user cannot run any other commands (such as "conf t").
Troubleshooting
On ISE there is a "Operation > TACACS Livelog" screen. We may see realtime authentication and authorization events.

Another Example of Command Set

1) Allow all "show" commands except for "show running-config" and "show startup-config" (to view the full configuration file)
2) However, it allows "show running-config interface" to view the configuration of a specific interface.
3) Allow "clear counters" command.
Please note the order of the rules. With the same command, more specific arguments should be on the top. Less specific arguments should be at the bottom.
